Servidores Web, Base de Datos y DNS en nuestros escenario de OpenStack
Tomando como referencia el escenario, vamos a realizar la instalación de un servidor web, un servidor de base de datos y un servidor DNS.
Servidor DNS
Vamos a instalar un servidor dns en charlie que nos permita gestionar la resolución directa e inversa de nuestros nombres. Vamos a poseer un servidor dns con autoridad sobre un subdominio de nuestro dominio principal gonzalonazareno.org, que se llamará mariajesus.gonzalonazareno.org.
apt-get install bind9Creamos las vistas
Para ello, vamos a crear vistas pero, ¿qué es una vista? Una vista es una forma de organizar las zonas de resolución en un servidor DNS. Una vista es una zona de resolución que se puede configurar de forma independiente. Por ejemplo, podemos tener una vista para la resolución de los nombres de las máquinas de la red interna y otra vista para la resolución de los nombres de las máquinas de la red externa.
De esta forma, podemos tener un servidor DNS que resuelva los nombres de las máquinas de la red interna y otro servidor DNS que resuelva los nombres de las máquinas de la red externa.
En nuestro caso, vamos a crear cinco vistas:
- Una vista que será la que tendrán
alfa,charlieydeltacon la IP192.168.0.0. - Una vista DMZ que resuelva a bravo con la IP
172.16.0.0. - Una vista externa que se muestre al exterior con la IP
172.22.0.0. - Dos vistas para la resolución inversa, una para la vista interna y otra para la vista DMZ.
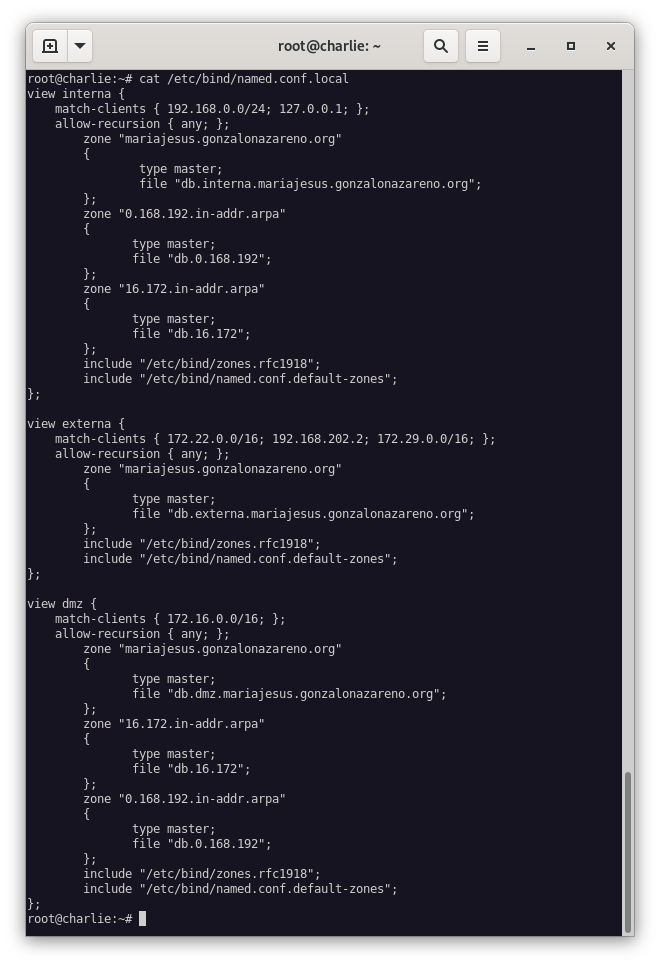
Para realizar la configuración, debemos realizarla en el fichero /etc/bind/named.conf.local, quedando de la siguiente manera:
view interna {
    match-clients { 192.168.0.0/24; 127.0.0.1; };
    allow-recursion { any; };
        zone "mariajesus.gonzalonazareno.org"
        {
               type master;
               file "db.interna.mariajesus.gonzalonazareno.org";
        };
        zone "0.168.192.in-addr.arpa"
        {
               type master;
               file "db.0.168.192";
        };
        zone "16.172.in-addr.arpa"
        {
               type master;
               file "db.16.172";
        };
        include "/etc/bind/zones.rfc1918";
        include "/etc/bind/named.conf.default-zones";
};

view externa {
    match-clients { 172.22.0.0/16; 192.168.202.2; 172.29.0.0/16;};
    allow-recursion { any; };
        zone "mariajesus.gonzalonazareno.org"
        {
               type master;
               file "db.externa.mariajesus.gonzalonazareno.org";
        };
        include "/etc/bind/zones.rfc1918";
        include "/etc/bind/named.conf.default-zones";
};

view dmz {
    match-clients { 172.16.0.0/16; };
    allow-recursion { any; };
        zone "mariajesus.gonzalonazareno.org"
        {
               type master;
               file "db.dmz.mariajesus.gonzalonazareno.org";
        };
        zone "16.172.in-addr.arpa"
        {
               type master;
               file "db.16.172";
        };
        zone "0.168.192.in-addr.arpa"
        {
               type master;
               file "db.0.168.192";
        };
        include "/etc/bind/zones.rfc1918";
        include "/etc/bind/named.conf.default-zones";
};
Y también modificaremos el fichero /etc/bind/named.conf de la siguiente manera:
// This is the primary configuration file for the BIND DNS server named.
//
// Please read /usr/share/doc/bind9/README.Debian.gz for information on the
// structure of BIND configuration files in Debian, *BEFORE* you customize
// this configuration file.
//
// If you are just adding zones, please do that in /etc/bind/named.conf.local

include "/etc/bind/named.conf.options";
include "/etc/bind/named.conf.local";
//include "/etc/bind/named.conf.default-zones";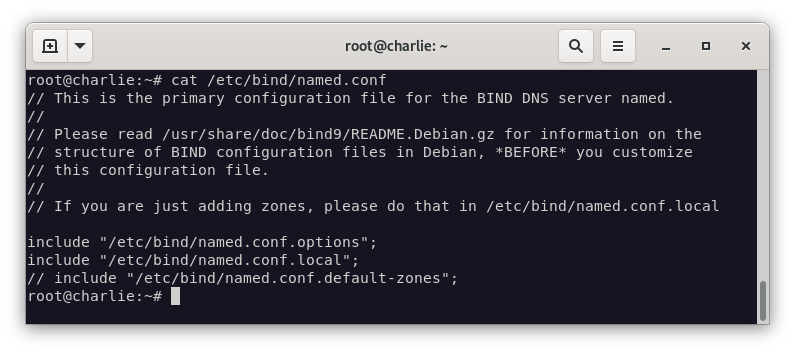
Creamos las zonas
Zona Externa
Para crear la zona externa, debemos crear el fichero /var/cache/bind/db.externa.mariajesus.gonzalonazareno.org con el siguiente contenido:
$TTL    86400
@       IN      SOA     alfa.mariajesus.gonzalonazareno.org. root.mariajesus.gonzalonazareno.org. (
                              1         ; Serial
                         604800         ; Refresh
                          86400         ; Retry
                        2419200         ; Expire
                          86400 )       ; Negative Cache TTL
;
@       IN      NS      alfa.mariajesus.gonzalonazareno.org.

$ORIGIN mariajesus.gonzalonazareno.org.

alfa        IN      A       172.22.201.46
dns         IN      CNAME   alfa
www         IN      CNAME   alfa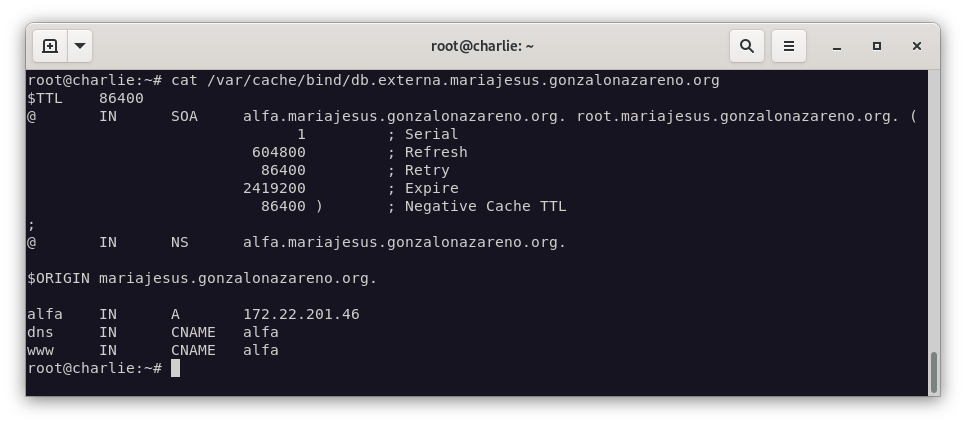
Zona Interna
Para crear la zona interna, debemos crear el fichero /var/cache/bind/db.interna.mariajesus.gonzalonazareno.org con el siguiente contenido:
$TTL    86400
@       IN      SOA     charlie.mariajesus.gonzalonazareno.org. root.mariajesus.gonzalonazareno.org. (
                              1         ; Serial
                         604800         ; Refresh
                          86400         ; Retry
                        2419200         ; Expire
                          86400 )       ; Negative Cache TTL
;
@       IN      NS      charlie.mariajesus.gonzalonazareno.org.

$ORIGIN mariajesus.gonzalonazareno.org.

alfa        IN      A       192.168.0.1
bravo       IN      A       172.16.0.200
charlie     IN      A       192.168.0.2
delta       IN      A       192.168.0.3
bd          IN      CNAME   delta
dns         IN      CNAME   charlie
www         IN      CNAME   bravo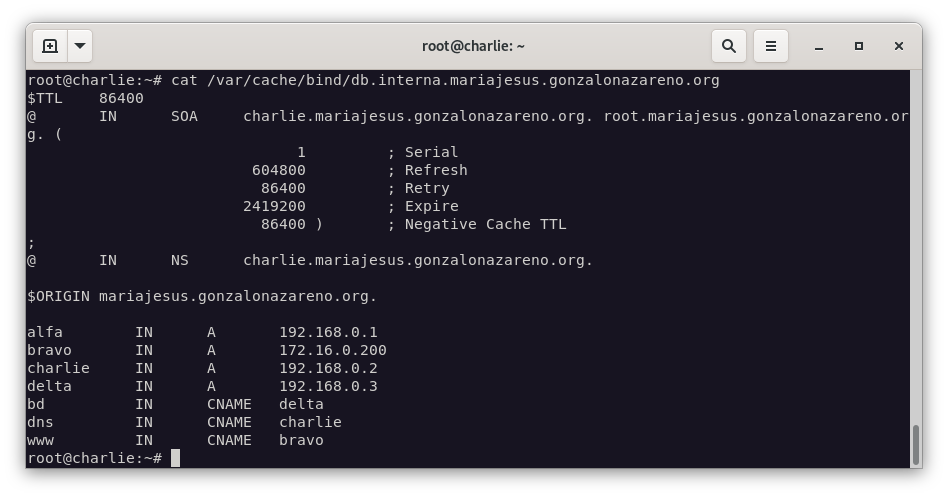
Zona DMZ
Para crear la zona DMZ, debemos crear el fichero /var/cache/bind/db.dmz.mariajesus.gonzalonazareno.org con el siguiente contenido:
$TTL    86400
@       IN      SOA     charlie.mariajesus.gonzalonazareno.org. root.mariajesus.gonzalonazareno.org. (
                              1         ; Serial
                         604800         ; Refresh
                          86400         ; Retry
                        2419200         ; Expire
                          86400 )       ; Negative Cache TTL
;
@       IN      NS      charlie.mariajesus.gonzalonazareno.org.

$ORIGIN mariajesus.gonzalonazareno.org.

alfa        IN      A       172.16.0.1
bravo       IN      A       172.16.0.200
charlie     IN      A       192.168.0.2
delta       IN      A       192.168.0.3
bd          IN      CNAME   delta
dns         IN      CNAME   charlie
www         IN      CNAME   bravo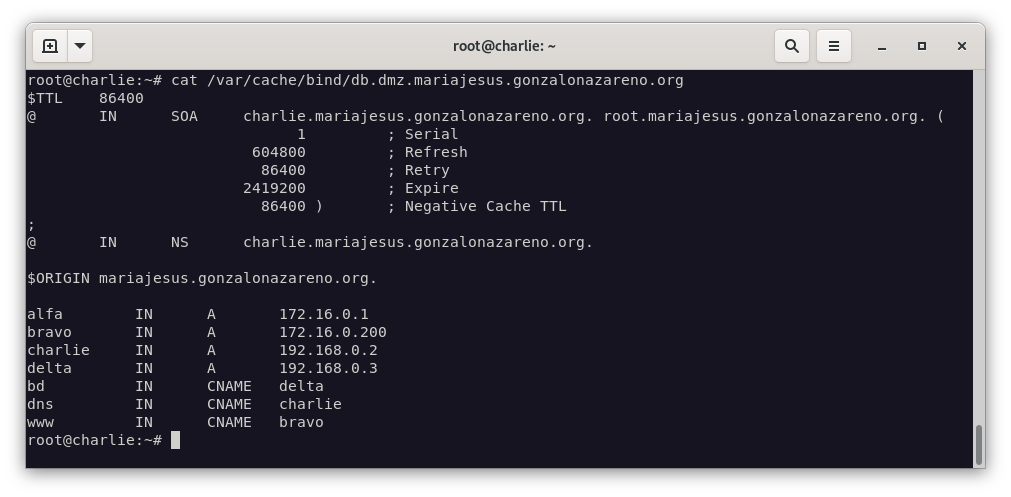
Zona Inversa Interna
Para crear la zona inversa interna, debemos crear el fichero /var/cache/bind/db.0.168.192 con el siguiente contenido:
$TTL    86400
@       IN      SOA     charlie.mariajesus.gonzalonazareno.org. root.mariajesus.gonzalonazareno.org. (
                              1         ; Serial
                         604800         ; Refresh
                          86400         ; Retry
                        2419200         ; Expire
                          86400 )       ; Negative Cache TTL
;
@       IN      NS      charlie.mariajesus.gonzalonazareno.org.

$ORIGIN 0.168.192.in-addr.arpa.

1       IN      PTR     alfa.mariajesus.gonzalonazareno.org.
2       IN      PTR     charlie.mariajesus.gonzalonazareno.org.
3       IN      PTR     delta.mariajesus.gonzalonazareno.org.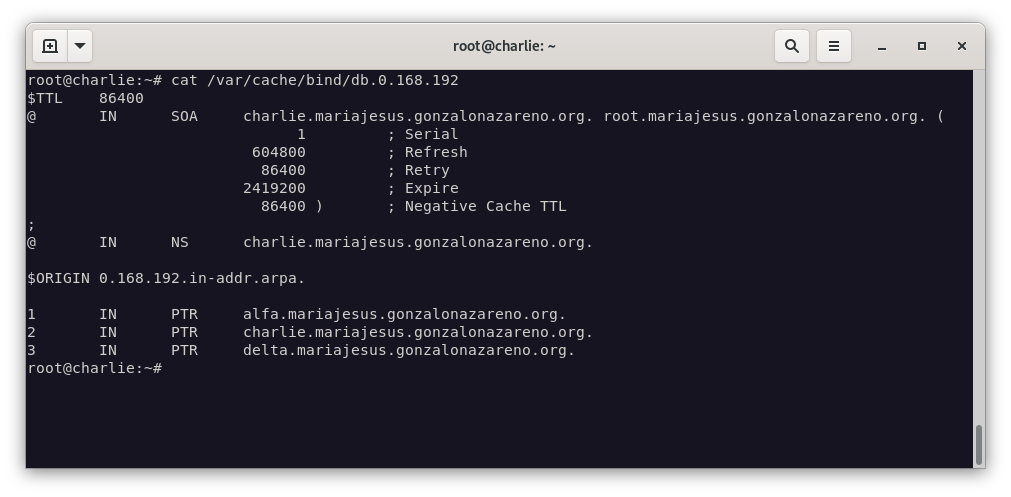
Zona Inversa DMZ
Para crear la zona inversa interna, debemos crear el fichero /var/cache/bind/db.16.172 con el siguiente contenido:
$TTL    86400
@       IN      SOA     charlie.mariajesus.gonzalonazareno.org. root.mariajesus.gonzalonazareno.org. (
                              1         ; Serial
                         604800         ; Refresh
                          86400         ; Retry
                        2419200         ; Expire
                          86400 )       ; Negative Cache TTL
;
@       IN      NS      charlie.mariajesus.gonzalonazareno.org.

$ORIGIN 16.172.in-addr.arpa.

1.0     IN      PTR     alfa.mariajesus.gonzalonazareno.org.
200.0   IN      PTR     bravo.mariajesus.gonzalonazareno.org.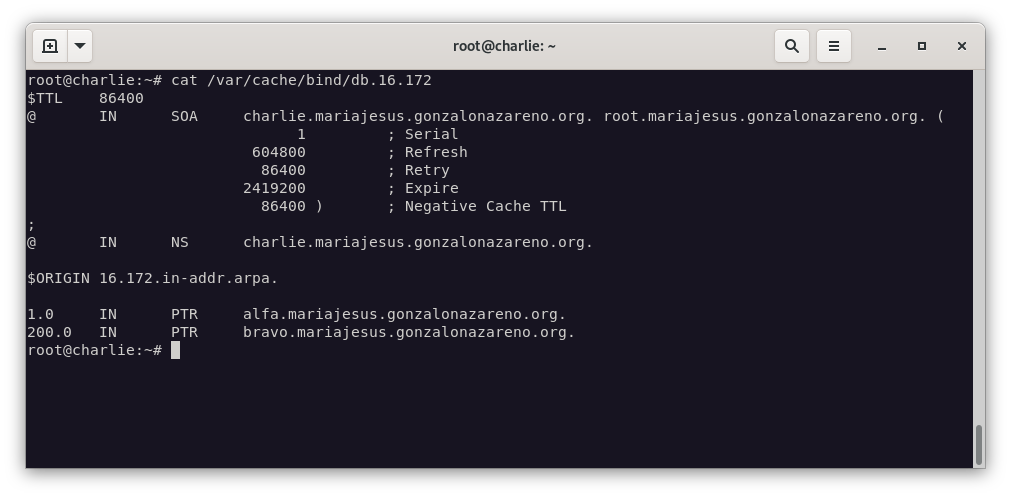
No debemos olvidar que también debemos modificar el fichero /etc/bind/zones.rfc1918 para desactivar las zonas inversas por defecto:
zone "10.in-addr.arpa"      { type master; file "/etc/bind/db.empty"; };

//zone "16.172.in-addr.arpa"  { type master; file "/etc/bind/db.empty"; };
zone "17.172.in-addr.arpa"  { type master; file "/etc/bind/db.empty"; };
zone "18.172.in-addr.arpa"  { type master; file "/etc/bind/db.empty"; };
zone "19.172.in-addr.arpa"  { type master; file "/etc/bind/db.empty"; };
zone "20.172.in-addr.arpa"  { type master; file "/etc/bind/db.empty"; };
zone "21.172.in-addr.arpa"  { type master; file "/etc/bind/db.empty"; };
//zone "22.172.in-addr.arpa"  { type master; file "/etc/bind/db.empty"; };
zone "23.172.in-addr.arpa"  { type master; file "/etc/bind/db.empty"; };
zone "24.172.in-addr.arpa"  { type master; file "/etc/bind/db.empty"; };
zone "25.172.in-addr.arpa"  { type master; file "/etc/bind/db.empty"; };
zone "26.172.in-addr.arpa"  { type master; file "/etc/bind/db.empty"; };
zone "27.172.in-addr.arpa"  { type master; file "/etc/bind/db.empty"; };
zone "28.172.in-addr.arpa"  { type master; file "/etc/bind/db.empty"; };
zone "29.172.in-addr.arpa"  { type master; file "/etc/bind/db.empty"; };
zone "30.172.in-addr.arpa"  { type master; file "/etc/bind/db.empty"; };
zone "31.172.in-addr.arpa"  { type master; file "/etc/bind/db.empty"; };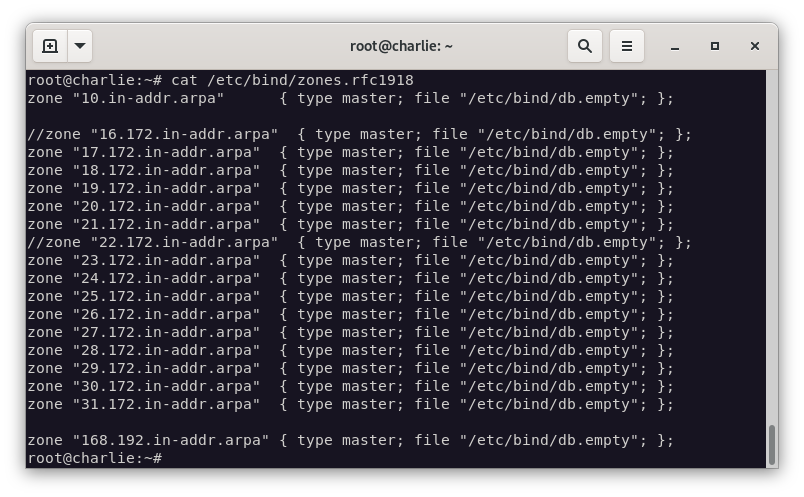
Configuración del forwarder
Vamos a modificar el fichero /etc/bind/named.conf.options para que el servidor papión actúe como forwarder:
       forwarders {
              192.168.202.2;
       };
Reiniciamos el servicio bind9:
systemctl restart bind9Servidor Web
En bravo vamos a instalar un servidor web apache. Recuerda que es una máquina con rocky linux. Para ello, debemos ejecutar los siguientes comandos:
Recordemos que esta máquina es una máquina con un sistema Rocky Linux.
sudo dnf install httpd php php-mysqlnd php-gd php-fpmIniciamos, habilitamos el servicio apache y comprobamos que está en ejecución:
sudo systemctl enable httpd
sudo systemctl enable php-fpm
sudo systemctl status httpd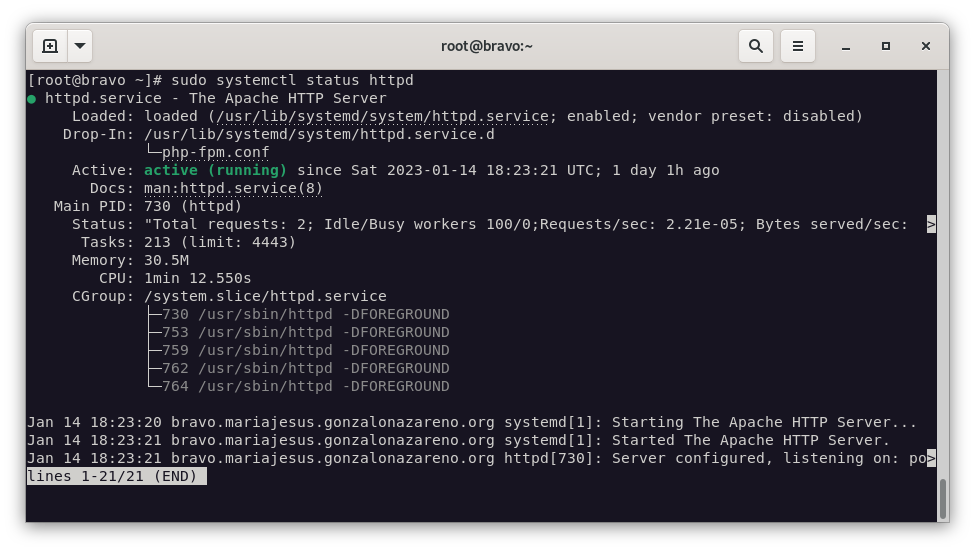
Configuración del VirtualHost
- Creamos los directorios
/etc/httpd/sites-availabley/etc/httpd/sites-enabled:
mkdir /etc/httpd/sites-available /etc/httpd/sites-enabled- Configuramos
/etc/httpd/conf/httpd.confpara que cargue los ficheros de configuración de los VirtualHosts:
#Añadimos esta línea al final del fichero
IncludeOptional sites-enabled/*.conf- Creamos el fichero
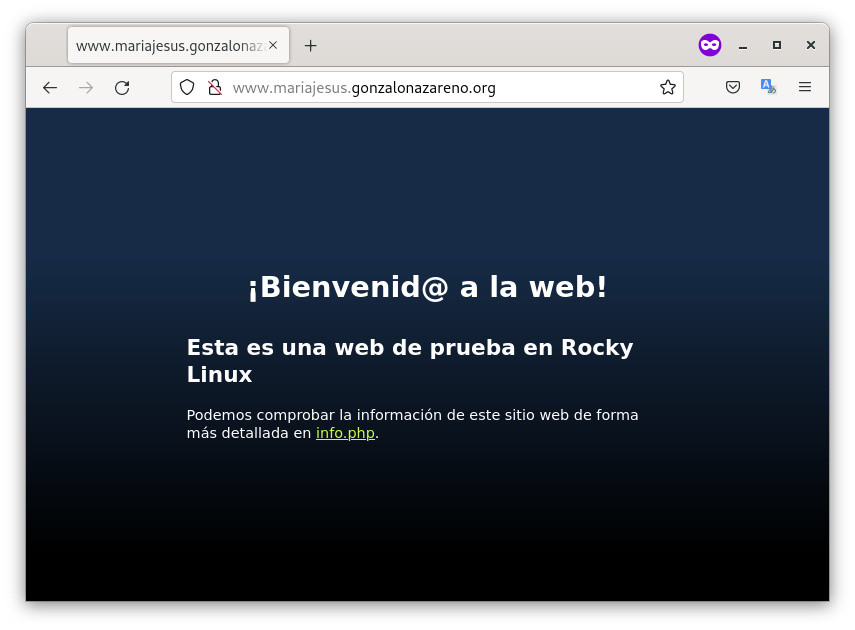
/etc/httpd/sites-available/www.mariajesus.gonzalonazareno.org.conf. Recordemos también que debemos incluir la configuración para agregar php al servidor web, por lo que el fichero quedaría con el siguiente contenido:
<VirtualHost *:80>
    ServerName www.mariajesus.gonzalonazareno.org
    DocumentRoot /var/www/html/mariajesus
    ErrorLog /var/www/html/mariajesus/log/error.log
    CustomLog /var/www/html/mariajesus/log/access.log combined
    <FilesMatch \.php$>
        SetHandler "proxy:unix:/run/php-fpm/www.sock|fcgi://localhost"
    </FilesMatch>
</VirtualHost>- Creamos el enlace simbólico en
/etc/httpd/sites-enabled:
sudo ln -s /etc/httpd/sites-available/www.mariajesus.gonzalonazareno.org.conf /etc/httpd/sites-enabled/www.mariajesus.gonzalonazareno.org.conf- Creamos el fichero
/var/www/html/mariajesus/info.php:
<?php
phpinfo();
?>- Creamos el index.html en
/var/www/html/mariajesus:
<html>
<head>
<meta charset='utf-8'>
<meta name='viewport' content='width=device-width, initial-scale=1'>
<title>www.mariajesus.gonzalonazareno.org</title>
<style type="text/css">
/*<

Servidor de Base de Datos
En delta vamos a instalar un servidor de base de datos mariajesusdb (bd.mariajesus.gonzalonazareno.org). A este seervidor de base de datos se debe permitir el acceso desde todas las máquinas del escenario.
Instalación y configuración remota de MariaDB
- Instalamos el servidor de base de datos, en este caso MariaDB.
sudo apt install mariadb-server- Configuramos MariaDB para conectarnos de forma remota.
NOTE: RUNNING ALL PARTS OF THIS SCRIPT IS RECOMMENDED FOR ALL MariaDB
      SERVERS IN PRODUCTION USE!  PLEASE READ EACH STEP CAREFULLY!
In order to log into MariaDB to secure it, we ll need the current password for the root user. If you ve just installed MariaDB, and you haven t set the root password yet, the password will be blank, so you should just press enter here.
Enter current password for root (enter for none):********
OK, successfully used password, moving on...
Setting the root password ensures that nobody can log into the MariaDB root user without the proper authorisation.
You already have a root password set, so you can safely answer 'n'.
Change the root password? [Y/n] Y
New password:********
Re-enter new password:********
Password updated successfully!
Reloading privilege tables..
 ... Success!
By default, a MariaDB installation has an anonymous user, allowing anyone to log into MariaDB without having to have a user account created for them. This is intended only for testing, and to make the installation go a bit smoother. You should remove them before moving into a production environment.
Remove anonymous users? [Y/n] Y
 ... Success!
Normally, root should only be allowed to connect from localhost. This ensures that someone cannot guess at the root password from the network.
Disallow root login remotely? [Y/n] Y
 ... Success!
By default, MariaDB comes with a database named test that anyone can access. This is also intended only for testing, and should be removed before moving into a production environment.
Remove test database and access to it? [Y/n] Y
 - Dropping test database...
 ... Success!
 - Removing privileges on test database...
 ... Success!
Reloading the privilege tables will ensure that all changes made so far will take effect immediately.
Reload privilege tables now? [Y/n] Y
 ... Success!
Cleaning up...
All done! If you ve completed all of the above steps, your MariaDB installation should now be secure.
Thanks for using MariaDB!- Creamos el usuario:
sudo mysql -u root -p
----
CREATE USER 'mariajesus'@'%' IDENTIFIED BY 'admin';
GRANT ALL PRIVILEGES ON *.* TO 'mariajesus'@'%';
FLUSH PRIVILEGES;
exit;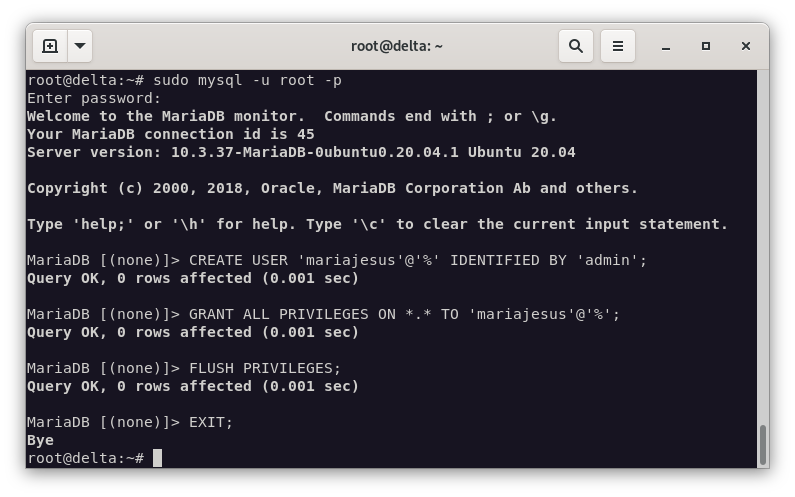
- Habilitamos el acceso remoto a la base de datos modificando el fichero
/etc/mysql/mariadb.conf.d/50-server.cnfy lo modificamos de la siguiente manera:
bind-address = 0.0.0.0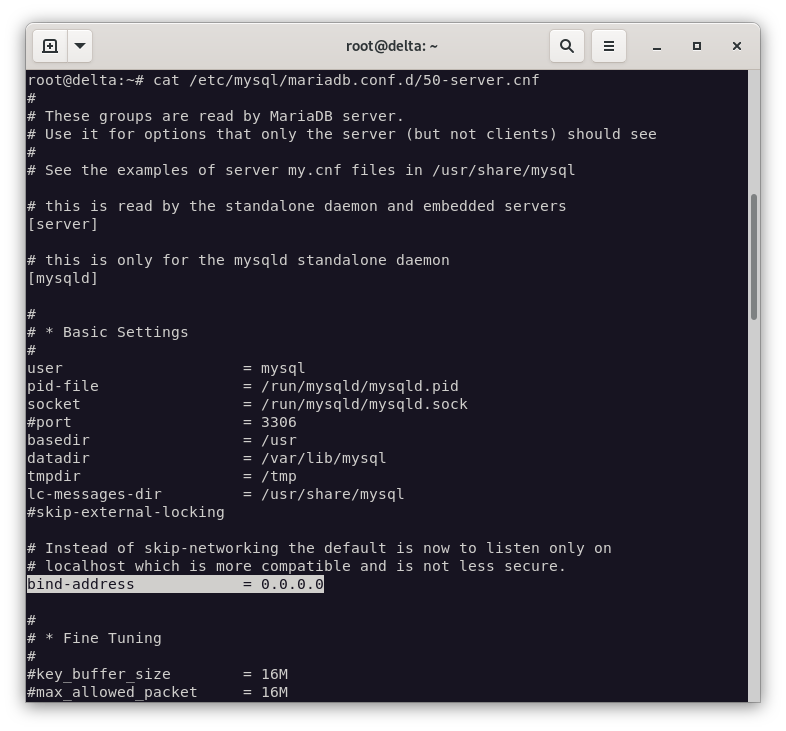
- Reiniciamos el servicio de MariaDB y comprobamos su estado.
systemctl restart mariadb
systemctl status mariadb
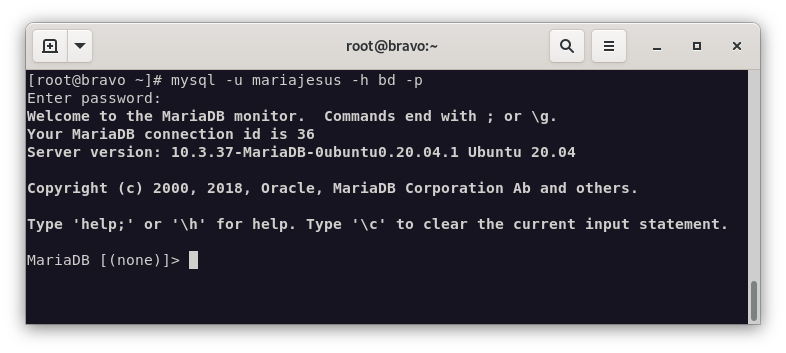
Configuración del acceso remoto a la base de datos desde bravo
- Instalamos el cliente de MariaDB en
bravo.
dnf install mariadb-server- Modificamos el fichero
/etc/resolv.confdonde pondremos la ip decharliecomo servidor DNS.
nameserver 192.168.0.2- Comprobamos que podemos acceder a la base de datos desde
bravo.
mysql - u mariajesus -p mariajesus -h bd -p